Overlays
Overlays are similar to libraries
Overlays serve a function similar to that of code libraries in other languages, namely collecting and encapsulating code in a particular category or domain and making it easy add and remove these collections of code as a group to projects.
However, all SkookumScript overlays are essentially open and build successively on top of one another starting with the Core overlay. They are somewhat analogous to layers in a graphic image editing program where each layer has some new visible content and also covers some content of earlier layers. Similar to image layers, each overlay can add more content which can be entirely new or it may also supersede content from a previous overlay. All the overlays for a project are flattened together and the resulting visibile content is the code base used for a SkookumScript project.
Related coding constructs include:
- overriding which has routines inherited from a superclass superseded with same named alternate routines in a subclass. Overriding is also supported in SkookumScript.
- overloading which has routines with the same name though with different parameters. Overloading is intentionally not supported in SkookumScript.
SkookumScript overlays add the construct of overlaying whole libraries to add and supersede collections of code over the earlier overlays.
Each overlay has a rank and overlays are applied in rank order. So code in a rank 1 overlay is added first, then the rank 2 overlay goes over top of that, then the rank 3 overlay on top of that, and so on. The Core overlay is always rank 1 - it has all the standard SkookumScript classes and routines such as Object, String, Integer, Boolean, List and Mind.
The current overlays for a project can be viewed in the SkookumIDE in the Overlays widget.
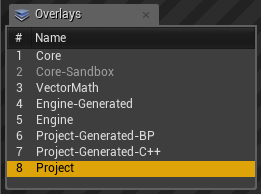
The Overlays widget. Disabled overlays are in a darker font and the overlay of the currently selected member has its line highlighted.
Whenever you use the New Class or Member pane in the Members widget you must specify the overlay that new classes and members belong to.
As you are looking at or editing script files, the Overlays widget will highlight the overlay location of the current member.
Overlay files
Overlays are specified in the MyProject\Scripts\Skookum-project.ini project settings file. The default overlays are usually sufficient for most projects.
TIP The current SkookumIDE doesn’t have a dialog to modify overlays yet – so overlay settings are currently modified by hand.
Example overlay section from the “SkookumDemo” project:
[Script Overlays]
Overlay1=*Core|Core\
Overlay2=-*Core-Sandbox|Core-Sandbox\
Overlay3=*VectorMath|VectorMath\
Overlay4=*Engine-Generated|Engine-Generated\|A
Overlay5=*Engine|Engine\
Overlay6=*Project-Generated|Project-Generated\|C
Overlay7=SkookumDemo|Project\
Notes on the project file overlay format
- The overlays are applied in increasing order so
Overlay5(theEngineoverlay above) will replace matches inOverlay4(theEngine-Generatedoverlay above). - There can be no gap in the overlay rank numbers.
- The first section (delimited with
|) in an overlay entry is the name of the overlay. (Examples from above include:Core,VectorMath,Engine.) - Overlays that start with a minus
-(such asCore-Sandboxabove) are disabled - i.e. they are essentially commented out. - Overlays that start with an asterisk
*(such asCoreandEngineabove) are set to be read-only. (This is done in the example above since those overlays are either generated or come from the SkookumScript team.) Overlays without an asterisk are editable using the SkookumIDE. You can of course remove the asterisk and edit layers such asCoreif you want to modify them to contribute scripts back to other teams using SkookumScript. We recommend making your own custom overlays (such asCore-Extrasjust afterCore) and just make changes in them and you can send such mini overlays that the SkookumScript team can then integrate into common overlays on request. - The second section in an overlay entry is the file path where the script files for the overlay are located. If it is a relative path, it is relative to this
.inifile. - The third section in an overlay indicates either:
- no special layout (default - such as
CoreandVectorMathabove) – has the folder layout mirror the class hierarchy with subclasses as subfolders of their superclass folder and there are separate files for class and instance data and each routine. |#a particular folder depth (not shown) – similar to the default layout, though some OSes still limit the max number of characters in folders so this ensures that no folder will go over that limit.|Cgenerated and non-editable per class archive files (such asProject-Generatedabove) – all the details for each class are stored in files named akin toSubClass.SuperClass.sk.|Agenerated and non-editable per overlay archive files (such asEngine-Generatedabove) – all the details for an entire overlay are stored in a single archive file named!Overlay.sk.
- no special layout (default - such as
Any changes to the project overlays should be made while the game engine and SkookumIDE do not have the project loaded or they are not running at all. Then reload the project or rerun the engine and SkookumIDE to take up the changes.