New Class or Member pane
The New Class or Member pane is located at the bottom of the Members widget. It may be small, but it is a powerhouse of creation.
Opening the New Class or Member pane
There are three ways to open the New Class or Member pane:
- On the File menu, select New Class or Member.
- Click on the collapsed New Class or Member pane at the bottom of the Members widget.
- Press Ctrl+N (think “N” for “New”).
NOTE If your UE4 project is not yet set up to use SkookumScript, you’ll be asked to set it up before the New Class or Member pane may be used.
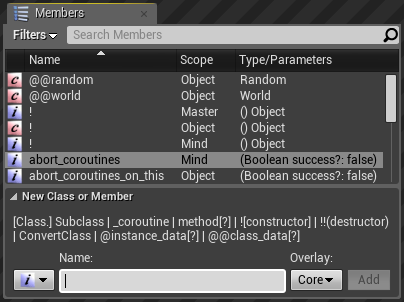
The New Class or Member pane expanded at the bottom of the Members widget. Before text is entered in the Name text box, the pane displays lexical hints; after text is entered, it displays information on the new class or member that will be added or any lexical errors. Use the instance/class (i/c) drop-down list box to the left of the Name box to specify the class scope of methods. Use the Overlay drop-down list box to the right of the Name box to specify the overlay to which the new class or data member will be added.
TIP When the Name box is empty, the New Class or Member pane will display the following hints. Use them to help jog your memory of what to type and what can be created.
[Class.] SubClass | _coroutine | method[?] | ![constructor] | !!(destructor) | ConvertClass | @instance_data[?] | @@class_data[?]
Adding a new subclass to an existing class
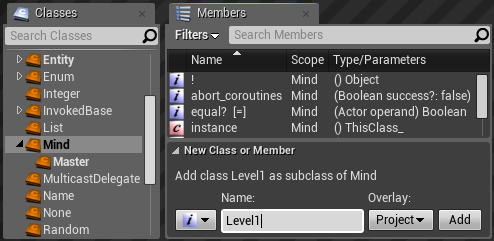
Adding a new Level1 class as a subclass of the Mind class (selected in the Classes widget) in the Project overlay.
To add a new subclass:
- Use the Overlay drop-down list box to specify the overlay the new subclass will be added to. This will usually be the Project overlay.
- Specify the working class to which you want to add a subclass by doing one of the following:
- Select the class in the Classes widget.
- In the New Class or Member widget, enter the name of the class followed by a period in the Name box. For example:
ClassName.
- Enter the name of the new subclass to be created. It must begin with a capital letter.
NOTE Class names must be unique – you can’t have more than one class with the same name and different superclasses in the same project. If the class name you enter is the same as an existing class, you will instead create a conversion method that converts the working class to the specified class type.
For example:
SubclassName - Press Enter or click Add.
When the new class is created, the SkookumIDE automatically selects it in the Classes widget.
NOTE Subclasses inherit all the members from their superclass.
Class meta files
When a new class is created, its class description comments and settings are stored in a class meta file (!Class.sk-meta). This file, plus any member files that are subsequently added to the class, is located in a folder based on the name of this new class and its superclass, which is in turn located in the folder of the overlay specified when this class was created.
If version control is enabled in the SkookumIDE, new class meta files are automatically added to version control mechanisms that track new files (such as the default changelist in Perforce).
The SkookumIDE keeps all the info about classes in memory for speed, though it uses the text files when initially loading class information.
The initial (default) text of the class meta file is automatically copied from the !Class.sk-meta text file located in this folder:
SkookumScript\SkookumIDE\Scripts\_Templates\
To change the default class meta file text for your company or project, edit the contents of !Class.sk-meta in the templates folder above and share it with the rest of your team via a mechanism such as version control.
[Extra] Renaming or deleting a class
(Not done with the New Class or Member pane though related so described here.)
To delete or rename a class (and all its members and subclasses), it is a simple brute force file operation. You can use the Classes widget to go to or determine the class folder location (potentially in more than one overlay) and then use File Explorer or your version control system to remove or rename it.
- Delete - Either remove the folder or rename the folder by prefixing with a minus sign
-(folders and files starting with a minus sign are ignored by the SkookumScript compiler). - Rename - Either rename, move to a new class folder (potentially from one overlay to another) or move and rename its folder.
 The SkookumIDE will auto-detect the changes. Then in the SkookumIDE, commit the changes (compile and send the changes to the project runtime) by going to the “Build” menu and select “Commit”, or press the “Commit” icon (gears)
  on the toolbar, or press the F7 hotkey. It will have a question mark if there are uncommitted changes and a check mark if it built properly and the changes were sent to the runtime.
Adding a new routine (coroutine or method) to a class
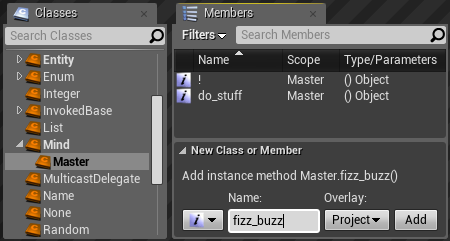
Adding a new fizz_buzz() as an instance method to the Master class (selected in the Classes widget) in the Project overlay.
To add a new routine (coroutine or method):
- Use the Overlay drop-down list box to specify the overlay to which the new coroutine or method will be added. This will usually be the Project overlay.
- Specify the working class to which you want to add a new routine by doing one of the following:
- Select the class in the Classes widget.
- In the New Class or Member widget, enter the name of the class followed by a period in the Name box. For example:
ClassName.
- In the Name box, enter the name of the new coroutine or method to be created. Routine names must be unique within a class.
- Coroutine names are prefixed with an underscore (
_) and begin with a lowercase letter and are for class instances only (step #4 is not necessary):
_coroutine_name - Method names begin with a lowercase letter:
method_name - Predicate method names begin with a lowercase letter, and are followed by a question mark (
?). Predicate methods have aBoolean(trueorfalse) result.
method_name? - Constructor method names are either a default constructor (for either a class instance or a class) with a single exclamation mark (
!) or a named constructor (class instance only) which are preceded by an exclamation mark and begin with a lowercase letter:
!or!constructor_name - Destructor method names are always two exclamation marks:
!! - Conversion method names are identical to an existing class and convert from the working class to this class:
ExistingClassName - Operator method names look like regular methods though they automatically are used for operators as well. When one is used, the hint text will display the associated operator operator symbols. For example
less?in the name box will display[<]in the hint text. Here are common operator names:
add,add_assign,subtract,subtract_assign,multiply,multiply_assign,divide,divide_assign,equal?,not_equal?,greater?,greater_or_equal?,less?,less_or_equal?,and,or,xor,nand,nor,nxor,not,negated,increment,decrement
- Coroutine names are prefixed with an underscore (
- If adding a method, use the instance/class (i/c) drop-down list box to specify whether the new method will be an instance method or a class method.
- If the new routine’s name matches the name of a related existing routine (see below) you will be alerted in the hint text. If a related matching routine is found, any new routine when added will copy the comments and the parameters of the matching routine described in the hint to help keep related routines consistent.
- Overriding - match in superclass. This routine will be an override of the superclass routine.
- Overridden - match in 1 or more subclasses. This routine will be overridden by the subclass(es) routine(s).
- Overlaying - match in lower ranked overlay. This routine overlays (supersedes) the routine in the lower ranked overlay.
- Overlaid - match in higher ranked overlay. This routine will be overlaid (superseded) by the routine in the higher ranked overlay.
- Same - same named routine already exists in the same class and same overlay. Add will become unavailable. Overloading (having the same routine name with different parameters on the same class) is intentionally not supported in SkookumScript.
- Press Enter or click Add.
When a routine is created, the SkookumIDE automatically opens it in an Editor widget so you can edit its description comments, parameters and code body. See the method file and coroutine file syntax for more information about routine files.
Routine files
When a new routine is created, an associated, individual .sk file will be saved in the folder of its class, which is in turn located in the folder of its overlay. See the syntax for method file names and coroutine file names for naming details.
If version control is enabled in the SkookumIDE, new routine files are automatically added to version control mechanisms that track new files (such as the default changelist in Perforce).
If there was no related matching routine (as described in step #5 above), the default text for methods will be copied from method().sk or for coroutines from _coroutine().sk. These files are located in the folder:
SkookumScript\SkookumIDE\Scripts\_Templates\
To change the default method and coroutine text for your company or project, edit the contents of these files and share them with the rest of your team (ideally via version control).
Why individual routine files?
The fact that SkookumScript routines are represented as individual files can be a bit surprising if you are accustomed to other languages (such as C++, C#, Javascript, and Lua) that jam all the routines together into a single file. There are many benefits to individual routine files: there are fewer conflicts in version control, parsing is simpler and constrained to a particular code region, and error messages are confined to the routine where they are first encountered.
[Extra] Renaming or deleting a routine
(Not done with the New Class or Member pane though related so described here.)
To delete a routine, use the context menu in the Members widget member list.
Renaming a routine is similar to renaming a class – you just rename or move the routine file using the File Explorer or your version control system. The SkookumIDE auto-detects the changes and then you commit the changes.
Adding a new data member
See Data Members to learn more about the declaration and use of data members.
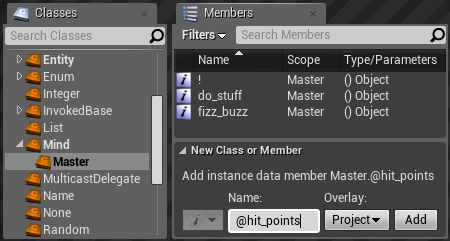
Adding a @hit_points instance data member to the Master class (selected in the Classes widget) in the Project overlay. Note the instance/class (i/c) drop-down list box is disabled since the class scope for a data member is determined by the number of its at @ symbols.
- Use the Overlay drop-down list box to specify the overlay to which the new coroutine or method will be added. This will usually be the Project overlay.
NOTE Data members are additive across overlays – a later overlay adds any new data members rather than entirely replacing any previous data member file. So successive overlays need only to define new data members rather than redundantly list out data members from earlier overlays. - Specify the working class to which you want to add a new data member by doing one of the following:
- Select the class in the Classes widget.
- In the New Class or Member widget, enter the name of the class followed by a period in the Name box. For example:
ClassName.
- In the Name box, enter the name of the new data member to be created. Data member names must be unique within an individual class, including all of its subclasses.
NOTE You cannot override a data member with the same name from a superclass.
- Instance data member names are prefixed with an at sign (
@) and begin with a lowercase letter:
@instance_data - Instance predicate data member names are prefixed with an at sign (
@), begin with a lowercase letter, and end with a question mark (?). Predicate data members are always of theBooleanclass and have the valuestrueorfalse.
@instance_predicate_data? - Class data member names are prefixed with two at signs (
@@) and begin with a lowercase letter:
@@class_data - Class predicate data member names are prefixed with two at signs (
@@), begin with a lowercase letter, and end with a question mark (?):
@@class_predicate_data?
- Instance data member names are prefixed with an at sign (
- Press Enter or click Add.
When a data member is created, the associated data member file is opened in an Editor widget that allows you to edit its class type and comments. If a data member file already exists, then the new data member is just appended to the bottom of the existing data members. Their order is irrelevant to the SkookumScript compiler, so you can arrange them however you like.
Data member files
Instance data members are added to a !Data.sk file and class data members are added to a !DataC.sk file. These files are located in the folder named after their class, which in turn is in the folder of the overlay that you specified when you added the data member. See Data member declaration.
If version control is enabled in the SkookumIDE, the data member file will be added (or made accessible, if it already exists) to the version control mechanism (such as the Perforce default changelist).
[Extra] Renaming or deleting a data member
(Not done with the New Class or Member pane though related so described here.)
Double click on the data member to change using the Members widget member list which will open the associated data member file in an Editor widget.
- Rename - just edit the data member identifier to give it a new name.
- Delete - remove the data member text or comment it out.
After the changes have been made, commit the changes (compile and send the changes to the project runtime) by going to the “Build” menu and select “Commit”, or press the “Commit” icon (gears) on the toolbar, or press the F7 hotkey. It will have a question mark if there are uncommitted changes and a check mark if it built properly and the changes were sent to the runtime.
Set up a non-SkookumScript UE4 project to use SkookumScript
A non-SkookumScript UE4 project must be SkookumScript-enabled (Skookified) before you can add classes and members. If you attempt to open the New Class or Member pane with a non-SkookumScript project, you will see a “Skookify your project?” message. Confirm that you would like to set up your project to use SkookumScript, and the New Class or Member pane will become available.